
As a React developer diving into the world of React Server Components (RSC) and Next.js, you might feel like you're entering uncharted territory. The familiar landscape of client-side React suddenly seems intertwined with server-side concepts, leaving you wondering: "How do I even begin to think about this?"
It's natural to feel overwhelmed. The mental model you've built for React development is being challenged, and questions are likely swirling in your mind:
What exactly is a Server Component, and how is it different from a Client Component?
When should I use one over the other?
How does data flow between these components?
What about state management and user interactions?
Why do Client Components get SSR'd to HTML?
Why does my content not update? And what's cached?
These questions are not just valid; they're crucial for understanding this new paradigm. Let's break down this complex topic and build a new mental model that will help you navigate the world of React Server Components with confidence.
The key to understanding React Server Components is to think of your application as having two distinct environments: the Server and the Client. These aren't just physical locations, but rather execution contexts within React itself. By grasping this concept, you'll be able to navigate the world of React Server Components with confidence.
Client Components vs Server Components
Let's break down the fundamental differences between Client and Server Components:
Server Components:
Render on the server
Can access server-side resources (databases, file systems)
Generate static HTML
Cannot have interactive elements or state
Ideal for data fetching and content-heavy parts of your app
Client Components:
Render on both server and client
Handle interactivity and state management
Use the
'use client'directiveIdeal for interactive UI elements
Think of Server Components as the foundation of your application, handling data fetching and initial content rendering, while Client Components add the layer of interactivity on top.
Data Flow from Server Component to Client Component
In the React Server Components model, data flows unidirectionally from Server Components to Client Components. This one-way data flow is crucial to understanding how to structure your application.
Here's a visual representation to help solidify this concept:
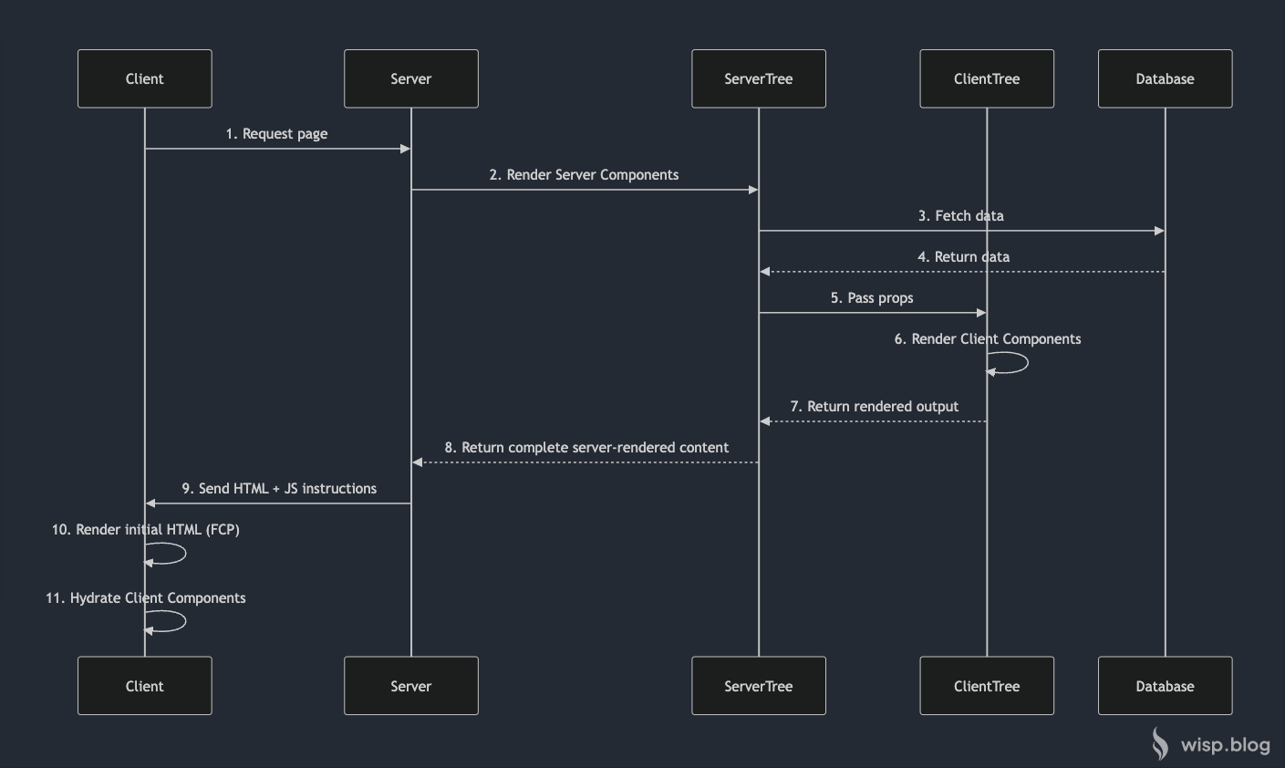
This diagram illustrates how the Server Tree prepares data and passes it as props to the Client Tree, which then generates both the initial HTML and the JavaScript bundle for interactivity.
Let's break down some what happens from the initial request from the client to interactivity in the client's browser:
Initial Request: The client sends a request to the server for a page.
Server Component Rendering: The server begins rendering Server Components. These components can directly access server-side resources.
Data Fetching: The Server Tree fetches necessary data from the database or other server-side resources.
Data Return: The database returns the requested data to the Server Tree.
Prop Passing: The Server Tree passes the fetched data as props to the Client Tree. This is the bridge between server and client rendering.
Client Component Rendering: The Client Tree renders the Client Components using the props received from the Server Tree.
Rendered Output: The Client Tree returns the rendered output back to the Server Tree. This includes the structure and content of Client Components.
Complete Server Rendering: The Server Tree combines its own rendered content with the Client Tree's output and returns the complete server-rendered content to the Server.
Initial HTML and JS Send: The server sends the generated HTML (for fast initial render) and JavaScript instructions (for interactivity) to the client.
Initial HTML Render (FCP): The client renders the initial HTML. This is when the First Contentful Paint (FCP) occurs, providing the user with visible content quickly.
Hydration: The client hydrates the Client Components. Hydration is the process of attaching event listeners and state to the server-rendered HTML, making it interactive. This is when the page becomes fully functional on the client side.
To further illustrate this data flow, let's look at a simple example:
// ServerComponent.tsx
async function ServerComponent() {
  const data = await fetch('https://api.example.com/data');
  const json = await data.json();

  return <ClientComponent serverData={json} />;
}

// ClientComponent.tsx
'use client'

import { useState } from 'react';

function ClientComponent({ serverData }) {
  const [count, setCount] = useState(0);

  return (
    <div>
      <h1>{serverData.title}</h1>
      <p>Count: {count}</p>
      <button onClick={() => setCount(count + 1)}>Increment</button>
    </div>
  );
}
In this example, ServerComponent fetches data on the server and passes it to ClientComponent, which handles the interactive elements. This pattern demonstrates how Server Components can handle data fetching and pass that data down to Client Components for rendering and interactivity.
What are Hydration Errors?
As you start working with Server Components and Next.js, you might encounter a new type of error: hydration errors. These can be particularly frustrating because they often don't show up during development but can cause issues in production.
To understand hydration errors, we first need to grasp the concept of pre-rendering in Next.js.
Pre-rendering in Next.js
Next.js pre-renders every page by default for better performance and SEO reasons. This means that Next.js generates HTML for each page in advance, instead of having it all done by client-side JavaScript. (See Step 9 in above figure)
There are two forms of pre-rendering in Next.js:
Static Generation (SG): The HTML is generated at build time and reused on each request.
Server-Side Rendering (SSR): The HTML is generated on each request.
Hydration
After the initial HTML is loaded, Next.js sends the JavaScript code to make the page fully interactive. This process is called hydration.
Hydration Errors
Hydration errors occur when the pre-rendered content doesn't match the content that would be generated by the client-side React application. This mismatch can happen for several reasons:
Using browser-only APIs in Server Components
Generating different content on the server and client
Using randomization or time-dependent logic without proper handling
To prevent hydration errors:
Ensure that Server Components don't generate different content on the server and client.
Use the
useEffecthook for client-side-only code in Client Components.If you need to render different content on the server and client, consider using the
useEffecthook to update the content after hydration.
Here's an example of how to handle server/client differences:
'use client'

import { useState, useEffect } from 'react'

export default function Component() {
  const [isClient, setIsClient] = useState(false)

  useEffect(() => {
    setIsClient(true)
  }, [])

  return (
    <div>
      {isClient ? (
        <p>This content is rendered on the client</p>
      ) : (
        <p>This content is rendered on the server</p>
      )}
    </div>
  )
}
This component will render the server content initially, then switch to the client content after hydration, avoiding any mismatch.
What are Static & Dynamic Routes?
One common problem faced by developers is when a page does not get updated in production when it's supposed to be dynamically generated. This could happen when your page is statically generated during build time.
As you build your Next.js application, you'll encounter two types of routes: static and dynamic. Understanding the difference between these is crucial for optimizing your app's performance and user experience.
Static Routes
Static routes are pages that are pre-rendered at build time. The content of these pages doesn't change unless you rebuild your application. They're ideal for content that doesn't need frequent updates.
Example of a static route:
/about
/contact
/blog/welcome-to-our-blog
Dynamic Routes
Dynamic routes are pages that are generated on-demand, either at request time (with Server-Side Rendering) or statically generated with dynamic params. They're perfect for pages where the content might change frequently or depends on external data.
Example of a dynamic route:
/blog/[slug]
/products/[id]
/users/[userId]/posts/[postId]
In these examples, [slug], [id], [userId], and [postId] are dynamic parameters that can change based on the specific content being requested.
Route Segment Config
Next.js 14 introduced Route Segment Config, which allows you to configure the behavior of Pages, Layouts, or Route Handlers by exporting specific variables. This gives you fine-grained control over how your routes behave.
Here's an example of how you can use Route Segment Config:
// layout.tsx | page.tsx | route.ts

export const dynamic = 'auto'
export const dynamicParams = true
export const revalidate = false
export const fetchCache = 'auto'
export const runtime = 'nodejs'
export const preferredRegion = 'auto'
export const maxDuration = 5

export default function MyComponent() {
  // Your component code here
}
These configuration options allow you to control various aspects of your route's behavior:
dynamic: Determines if the route is statically or dynamically rendered.dynamicParams: Controls whether dynamic params are statically generated or server-rendered.revalidate: Sets the default revalidation time for a layout or page.fetchCache: Configures how Next.js caches fetch requests.runtime: Specifies which runtime to use for the route.preferredRegion: Sets the preferred region for edge runtime.maxDuration: Specifies the maximum duration for serverless functions.
When deciding thinking about static and dynamic routes:
Use static routes for content that doesn't change often, like "About" or "Contact" pages.
Use dynamic routes for content that changes frequently or depends on user input, like blog posts or product pages.
Leverage Route Segment Config to fine-tune the behavior of your routes. For example:
Set
dynamic = 'force-dynamic'for routes that always need fresh data.Use
revalidate = 60to revalidate the cache every 60 seconds.Set
fetchCache = 'force-no-store'to always fetch fresh data without caching. (more on caching later)
Consider using Incremental Static Regeneration (ISR) for dynamic routes that change infrequently, to get the benefits of static generation with the flexibility of dynamic content.
Refer to the Next.js documentation on Route Segment Config for a detailed explanation of each configuration option and how to use them effectively.
By understanding and utilizing static routes, dynamic routes, and Route Segment Config, you can create a Next.js application that's both performant and flexible, capable of handling a wide range of use cases and content types.
What are Caching?
Caching in Next.js is a powerful feature that stores and reuses previously fetched data or rendered content. It helps reduce the load on your server and improves the response time of your application.
Next.js provides several types of caching:
Request Memoization: This caches the results of data fetches within a single request. This means you can call a
fetch()function for the same data in multiple places while only executing it once. (Caching Step 3 in diagram above)Data Cache: This caches the results of data fetches. When you use
fetch()in your Server Components, Next.js automatically caches the result. (Caching Step 3 in diagram above)Full Route Cache: This caches the rendered result of an entire route, including all its Server Components. (Caching Step 1 in diagram above, at the server side)
Router Cache: This client-side cache stores the rendered result of static and dynamic routes as you navigate through your application. (Caching Step 1 in diagram above, at the client side)
To effectively use caching in your Next.js application:
Leverage the automatic caching of
fetch()in Server Components for data that doesn't change frequently.Use the
revalidateoption to control how often your data or routes are revalidated:// in fetch fetch('https://...', { next: { revalidate: 3600 } }) // in layout.tsx | page.tsx | route.ts export const revalidate = 3600For dynamic data that changes frequently, use
cache: 'no-store'to opt out of caching:// in fetch fetch('https://...', { cache: 'no-store' })Use the
generateStaticParamsfunction for dynamic routes to specify which params should be statically generated at build time.Refer to the Next.js documentation on Caching in Next.js for a detailed explanation of each configuration option and how to use them effectively.
Consider turning on logging for the full URL when debugging issues with caching and and the route segment config.
// next.config.js
module.exports = {
  logging: {
    fetches: {
      fullUrl: true,
    },
  },
}
Next 14 vs Next 15 Default Caching Behavior Difference
In Next.js 14, force-cache was used by default, unless a dynamic function or dynamic config option was used. Dynamic functions rely on information that can only be known at request time such as a user's cookies, current requests headers, or the URL's search params. This means most of your fetch requests will be cached.
In Next.js 15, no-store is used by default if a cache option is not provided. This means fetch requests will not be cached by default unless you opt-in using the cache option on fetch or use the route segment config.
Putting it all together
Now that we've explored the key concepts of React Server Components and Next.js, let's see how they all work together in a typical application flow:
A user requests a page from your Next.js application.
Next.js checks if the page is in the Full Route Cache. If it is, it serves the cached version immediately.
If not in cache, Next.js renders the page:
Server Components fetch necessary data, potentially using the Data Cache.
The server generates HTML from Server Components.
Client Components are serialized and sent along with the HTML.
The browser receives the initial HTML and displays it (fast initial load).
The browser then hydrates the Client Components, making interactive elements functional.
As the user navigates, the Router Cache comes into play, providing instant navigation between pre-rendered routes.
If the user triggers an action that requires fresh data, the application can revalidate the cache and update the content.
This flow combines the benefits of server-side rendering, static generation, and client-side interactivity, all while optimizing performance through intelligent caching.
Conclusion
React Server Components and Next.js represent a paradigm shift in how we build React applications. By separating concerns between Server and Client Components, leveraging intelligent caching, and combining static and dynamic routing, we can create applications that are both performant and dynamic.
As you continue to work with these technologies, you'll discover even more ways to optimize and improve your applications. The learning curve may be steep, but the benefits in terms of performance, SEO, and developer experience are well worth the effort.
Remember, the best way to solidify your understanding is through practice. Start building with React Server Components and Next.js, experiment with different patterns, and don't be afraid to push the boundaries of what's possible. Happy coding!
Acknowledgement
Thanks Dan for putting up this guide on "Why do Client Components get SSR'd to HTML?"!