You've integrated Stripe into your e-commerce platform or SaaS application, and you're ready to go live with real payments. However, before unleashing your payment flow to customers, you want to ensure everything is working flawlessly in the live environment. After all, the last thing you want is for customers to encounter issues during checkout or for webhooks to fail, leading to order fulfillment nightmares.
As a responsible developer or business owner, you understand the importance of thorough testing, especially when it comes to mission-critical components like payment processing. You've likely already tested your Stripe integration extensively in the test environment, but there's always a lingering doubt – what if something changes or behaves differently in the live environment?
Perhaps you've updated your Stripe account settings, modified your webhook endpoints, or made configuration changes that could potentially impact the payment flow. Or maybe you're just extra cautious and want to leave no stone unturned before going live.
The thought of customers experiencing payment failures or incomplete orders due to untested scenarios is enough to keep you up at night. You know that a smooth payment experience is crucial for customer satisfaction and retention, and any hiccups could damage your brand's reputation and bottom line.
Fortunately, there's a clever way to test your Stripe integration in the live environment without incurring any actual transaction costs.
By leveraging Stripe's coupon functionality, you can simulate real payments while ensuring that no money changes hands.
Step 1: Create a 100% Off Coupon
The first step is to create a coupon in your Stripe dashboard that provides a 100% discount on any charges. Here's how:
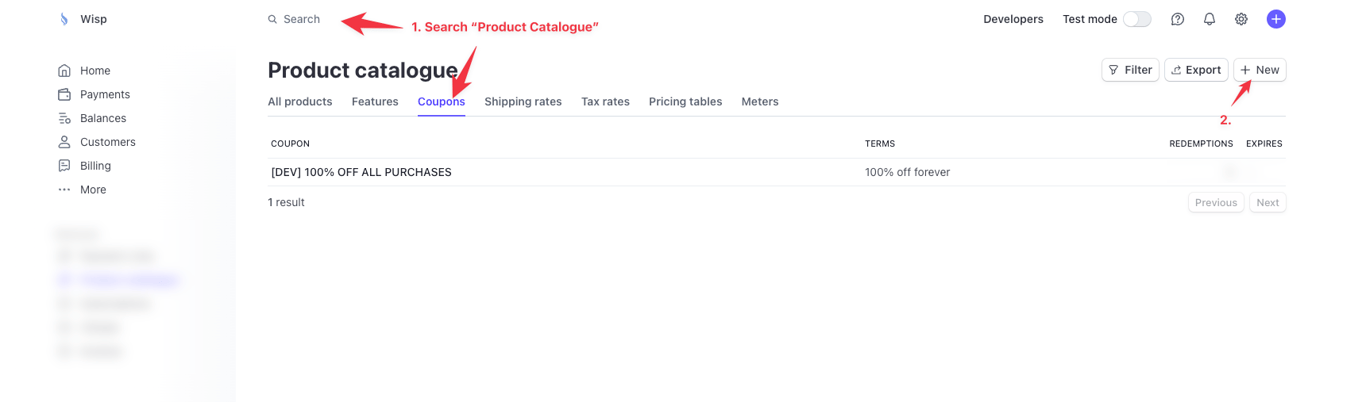
Log in to your Stripe dashboard and navigate to the "Coupons" section under the "Product Catalogue" menu.
Click on the "New" button.
Enter a coupon name (e.g., "Test Coupon").
Under "Coupon Details," set the "Discount Type" to "Percentage" and the "Discount Value" to 100%.
Optionally, you can set an expiration date for the coupon or limit the number of times it can be redeemed.
Click "Create Coupon" to save your changes.
With your 100% off coupon created, you now have a way to simulate real payments without actually being charged.
Step 2a: Generate Promotion Code and Apply During Checkout
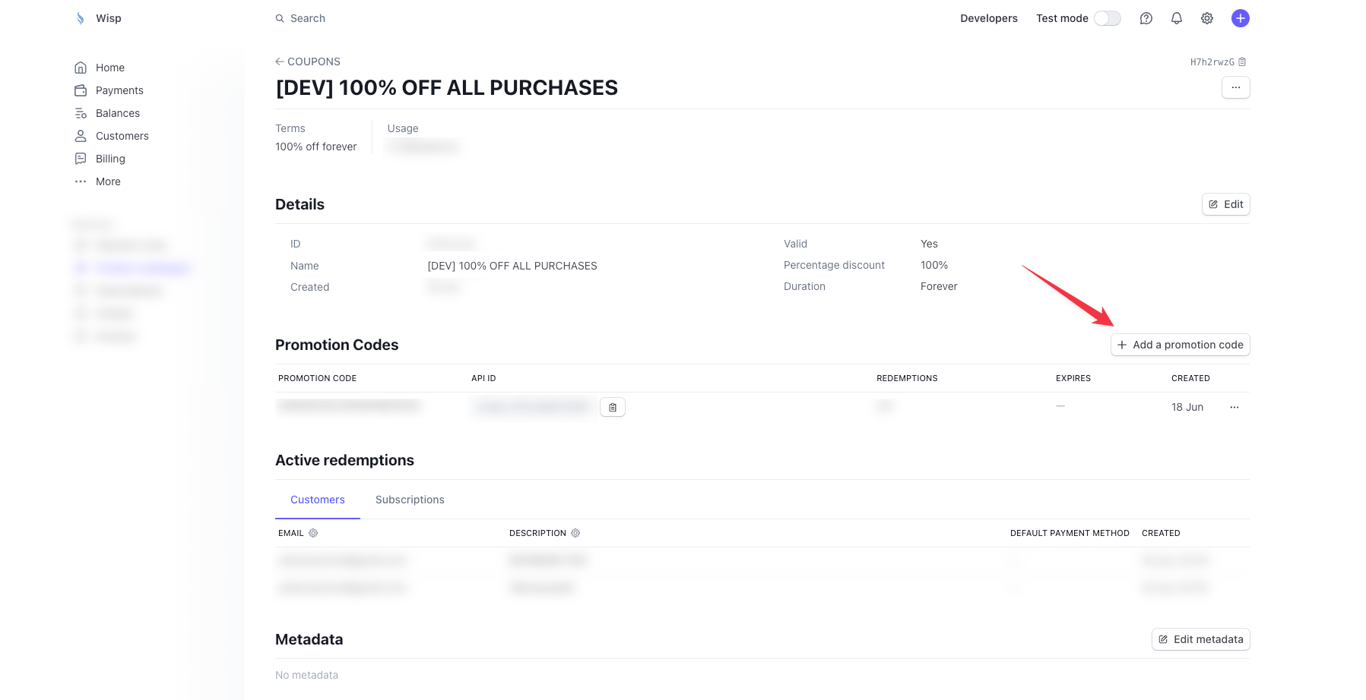
If your checkout flow allows customers to enter promotion codes, you can use the coupon you created earlier to generate a promotion code for testing purposes. Here's how:
In your Stripe dashboard, navigate to the "Coupons" section and click on the coupon you created earlier (e.g., "Test Coupon").
Under the "Promotion Codes" section, click "Add Promotion Code."
Enter a promotion code (e.g., "TESTPROMO") and optionally set a limit on the number of times it can be redeemed or an expiration date.
Click "Add Promotion Code" to save your changes.
In your Stripe integration code, when creating a new Checkout Session, make sure to set the
allow_promotion_codesparameter totrue. This will enable a field for customers to enter a promotion code during the checkout process.
const session = await stripe.checkout.sessions.create({
  // ... other session parameters
  allow_promotion_codes: true,
});
During the checkout process, the developer can enter the promotion code you generated (e.g., "TESTPROMO").
When the developer completes the checkout process, the promotion code will be applied, and no actual charge will be made to their payment method.
By following this approach, you can test the entire checkout flow, including any webhooks or post-payment logic, without incurring any costs.
Note that the promotion code is different from the coupon code itself. The coupon code is used to create the coupon in the Stripe dashboard, while the promotion code is the code that customers will enter during the checkout process to apply the coupon's discount.
Step 2b: Create Customer and Attach Promotion Code Directly
Alternatively, if your integration doesn't support entering promotion codes during checkout, you can create a test customer in your Stripe dashboard and directly attach the coupon to their account. Here's how:
In your Stripe dashboard, navigate to the "Customers" section.
Click on the "Add Customer" button and enter the necessary customer details.
Once the customer is created, click on their name to view their details.
Under the "Payment Methods" section, click "Add Payment Method" and enter a valid credit or debit card number (this card won't be charged due to the coupon).
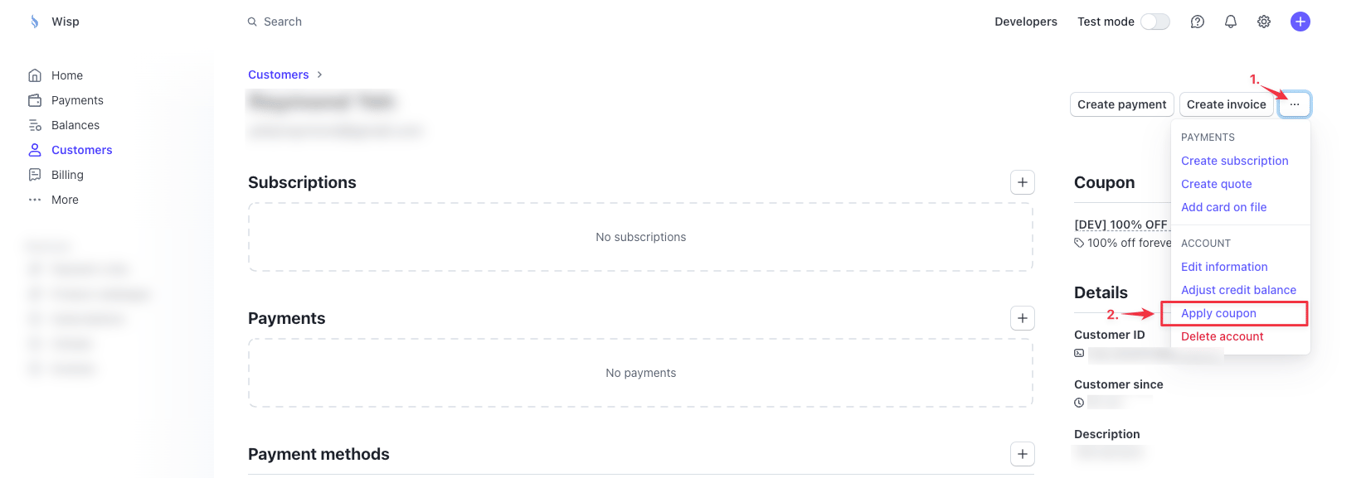
After adding the payment method, return to the "Customer" section and click "Apply Coupon" on the expanded menu.
Enter the coupon code you created earlier (e.g., "TEST100") and click "Apply."
With the coupon attached to the test customer, any charges you initiate through your Stripe integration for this customer will be discounted by 100%, effectively making them free.
Common Mistakes to Avoid
While testing your Stripe integration in live mode, be mindful of the following common mistakes:
Listening to the Wrong Webhook Event
If you're handling completed orders through webhooks, make sure you're listening for the checkout.session.completed event instead of the payment_intent.succeeded event.
Free or discounted orders won't have an associated PaymentIntent, so relying on the payment_intent.succeeded event could lead to missed orders.
See Stripe's documentation on handling completed orders for no-cost orders.
Not Enabling Promotion Codes
If you're using the "Generate Promotion Code and Apply During Checkout" approach (Step 2a), ensure that you've set the allow_promotion_codes parameter to true when creating the Checkout Session.
Otherwise, your developers won't be able to enter the coupon code during checkout.
Monitoring and Handling Live Test Orders
Once you've completed your live testing, you can monitor and handle any test orders you've created in the Stripe dashboard.
Here's how:
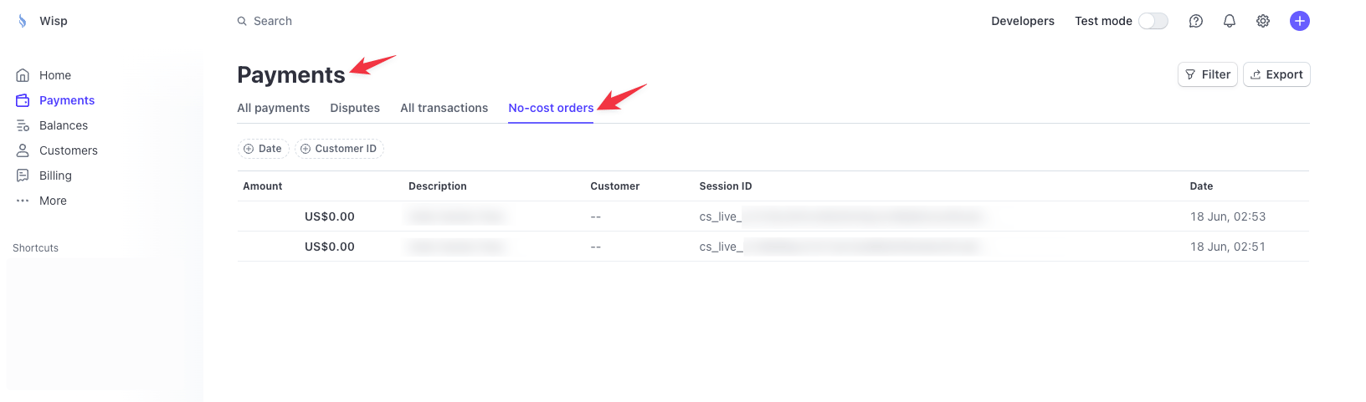
In your Stripe dashboard, navigate to the "Payments" section.
You'll see a tab labeled "No-cost Orders" if you have any completed test orders using the 100% off coupon.
From here, you can view the details of each test order, including the line items and any associated metadata.
If necessary, you can fulfill these test orders just like regular orders, allowing you to test your entire order fulfillment process.
By leveraging Stripe's coupon functionality and following the steps outlined above, you can thoroughly test your payment integration in the live environment without incurring any actual transaction costs. This approach ensures that you catch any potential issues or configuration errors before going live with real customer payments, providing peace of mind and a smooth launch experience for both you and your customers.