As a business owner or marketer, you've likely grappled with the challenges of email communication. Perhaps you've watched helplessly as your carefully crafted messages languished in spam folders, or struggled to scale your campaigns as your audience grew. You're not alone. Many businesses find themselves caught between the need for robust email capabilities and the complexity of implementing them effectively.
But what if there was a way to harness the power of Microsoft's established infrastructure to supercharge your email efforts? Azure's Email Communication Services offers just that - a comprehensive solution that combines superior deliverability, high-volume capabilities, and marketing email support, all wrapped up in a scalable, cost-effective package.
Microsoft Azure offers a robust solution for outbound email that boasts several advantages:
Superior Deliverability: Microsoft's established reputation and infrastructure ensure that your emails have a higher chance of landing in the recipient's inbox rather than the spam folder.
High-Volume Capability: Azure's Email Communication Services can handle large-scale email campaigns, making it ideal for businesses with extensive mailing lists.
Marketing Email Support: Unlike some other providers, Microsoft Azure allows for marketing emails to be sent, provided certain parameters are met.
Scalability: As your email needs grow, Azure can easily accommodate increased volume through quota increases.
Cost-Effective: With competitive pricing, Azure provides an economical solution for businesses of all sizes.
Despite these benefits, setting up Microsoft Azure for outbound email using SMTP can be a complex process. Many users find themselves piecing together information from various sources, leading to confusion and potential errors. That's why we've created this comprehensive, step-by-step guide to walk you through the entire process.
In this article, we'll cover everything from setting up the initial Email Communication Services to configuring SMTP credentials for programmatic email sending. We'll also address common questions about email volume limits, quota increases, costs, and specific configuration challenges.
Let's begin with the first crucial step: Setting up Email Communication Services.
Step 1: Set Up Email Communication Services
In this initial step, we'll create a new email communication service and connect it to a custom domain. This forms the foundation of your Azure email setup.
Step 1.1: Log into the Microsoft Azure Portal: Navigate to https://portal.azure.com/ and sign in with your Azure credentials.
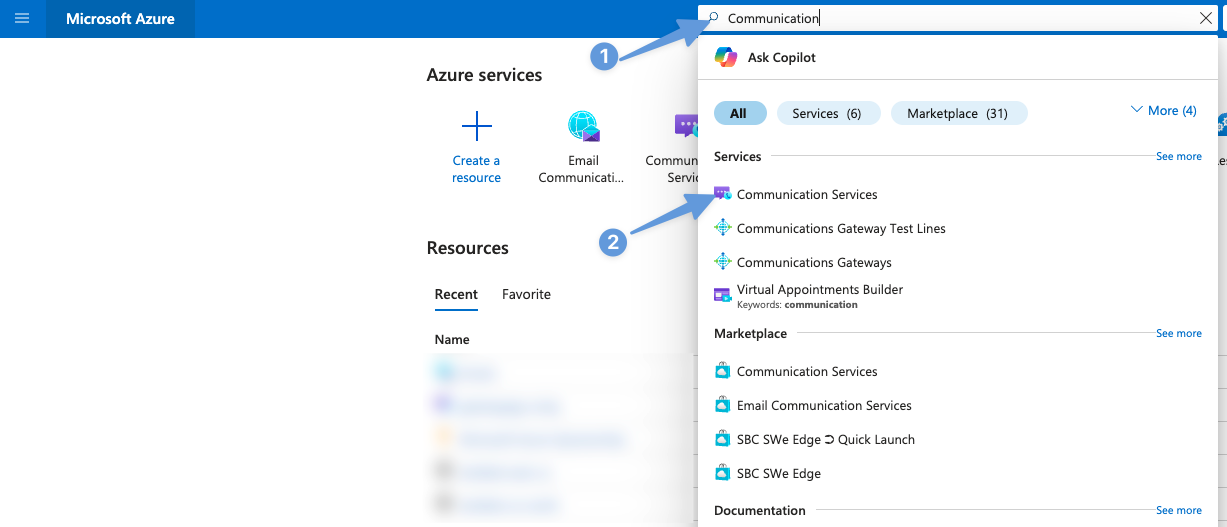
Step 1.2: Search for "Email Communication Services": Use the search bar at the top of the Azure portal to find this service.
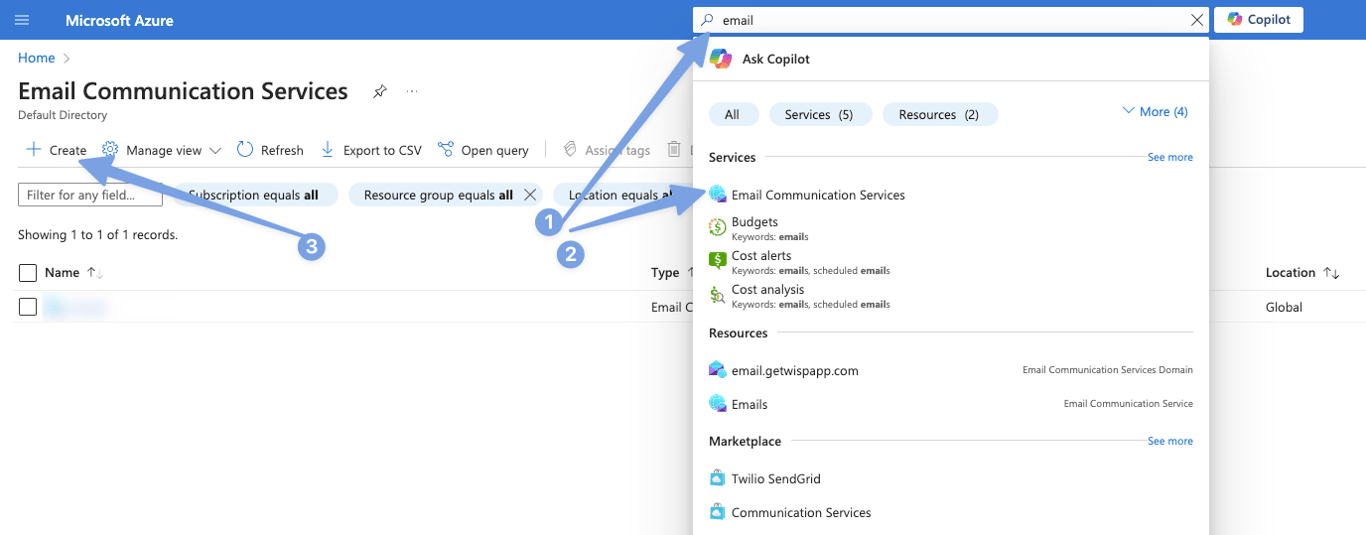
Step 1.3: Create a new service: Click on "Create" to set up a new Email Communication Service. The provisioning process typically takes 1-5 minutes.
Step 1.4: Access the provisioned service: Once created, go to the new service and click on "Provision domains".
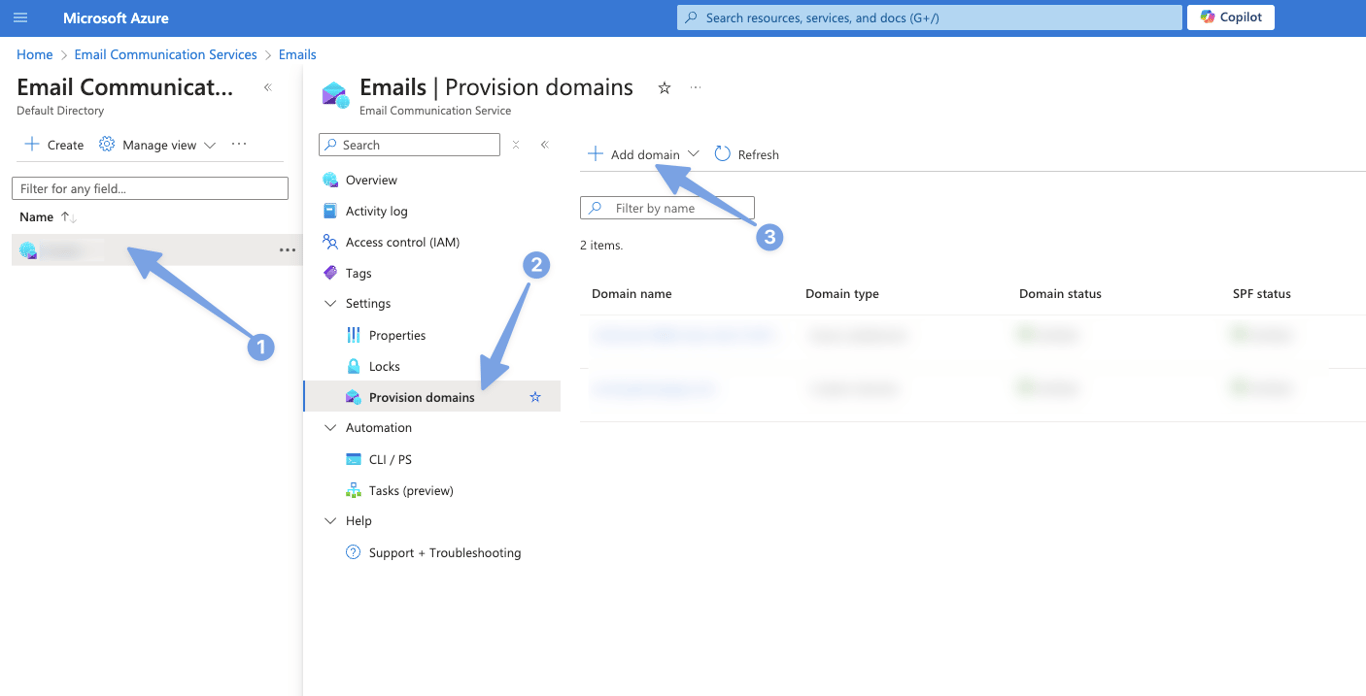
Step 1.5: Add your custom domain: Click on "Add domains" and enter your custom domain. You can use a subdomain if preferred.
Step 1.6: Verify your custom domain: Azure will provide you with a TXT record. Add this to your domain's DNS settings to verify ownership.
Step 1.7: Set up DKIM and SPF: Configure DKIM (DomainKeys Identified Mail) and SPF (Sender Policy Framework) records in your DNS settings. Azure will provide the necessary values.
Additional notes:
Consider using a subdomain instead of your root domain for email purposes.
You'll need to add two CNAME records for DKIM.
The SPF record must be added exactly as provided by Azure. If you already have an SPF record, you'll need to merge it carefully, as Azure requires a specific format for detection.
By completing this step, you've laid the groundwork for your Azure email setup. In the next steps, we'll connect this email service to a Communication Service and configure the necessary permissions and credentials for SMTP access.
Step 2: Set Up Communication Services
Now that we have our Email Communication Service set up, we need to connect it to a new Communication Service. This might seem redundant, but it's a crucial step in Azure's architecture for email services.
Step 2.1: Search for "Communication Services": Use the Azure portal's search bar to find this service.
Step 2.2: Create a new service: Click "Create" and fill out the necessary details. The provisioning process usually takes 1-5 minutes.
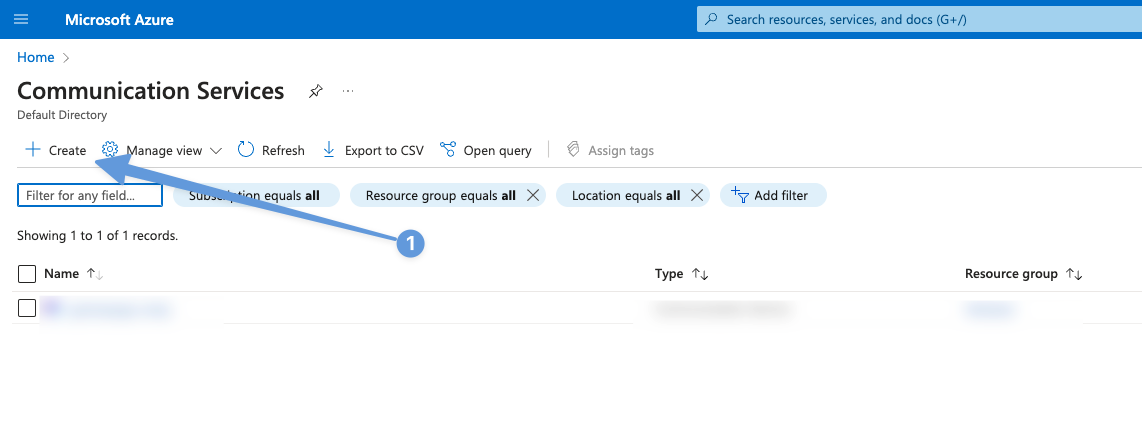
Step 2.3: Access t he new service: Once provisioned, click on the new Communication Service.
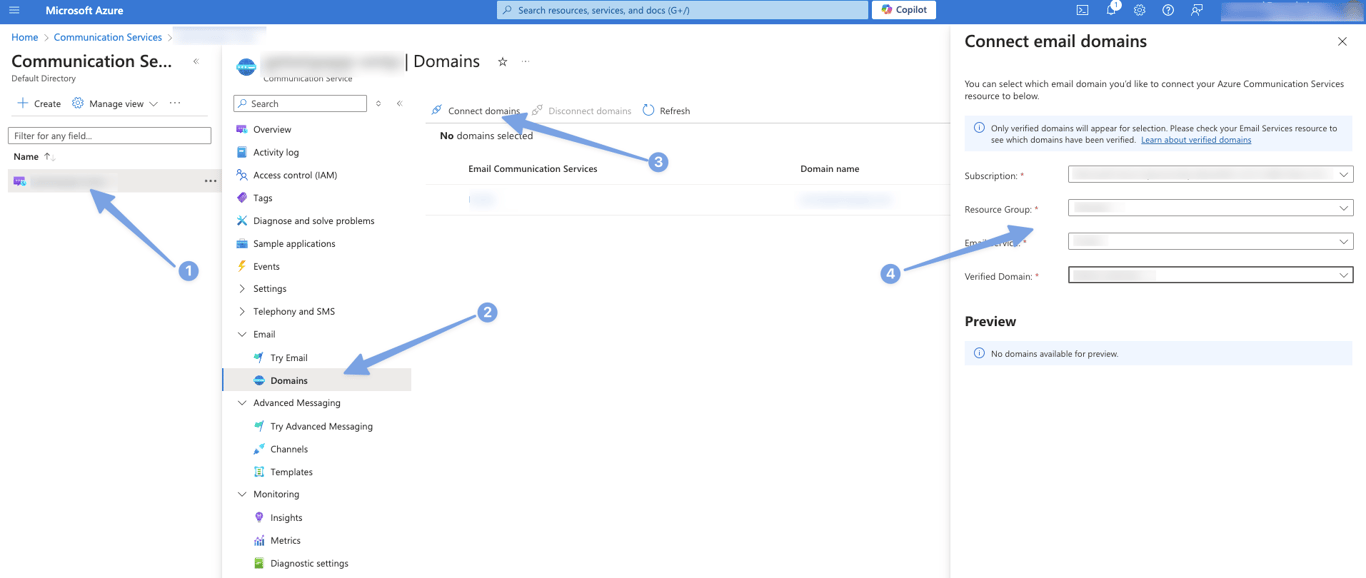
Step 2.4: Navigate to Domains: In the left sidebar, under "Emails", select "Domains".
Step 2.5: Connect your domain: Click on "Connect domain" and fill in the required information.
(Optional) Step 2.6: Test the connection: You can use the "Try Email" feature to ensure everything is working correctly.
With this step completed, we've successfully linked our Email Communication Service to a Communication Service. Next, we'll set up the necessary credentials for SMTP access.
Step 3: Set Up Microsoft Entra
To enable programmatic sending of emails via SMTP clients, we need to set up an application in Microsoft Entra (formerly Azure Active Directory).
Step 3.1: Access Microsoft Entra admin center: Navigate to https://entra.microsoft.com/
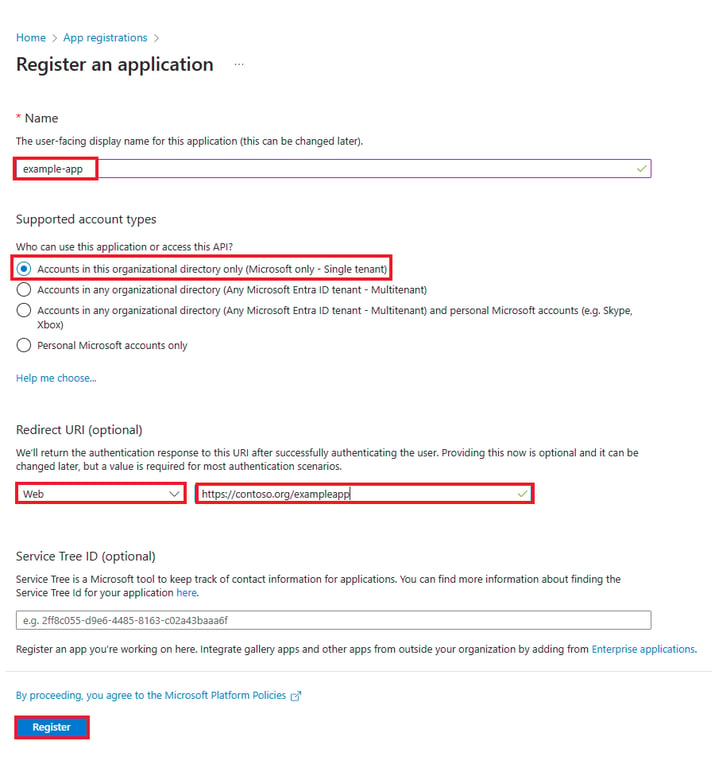
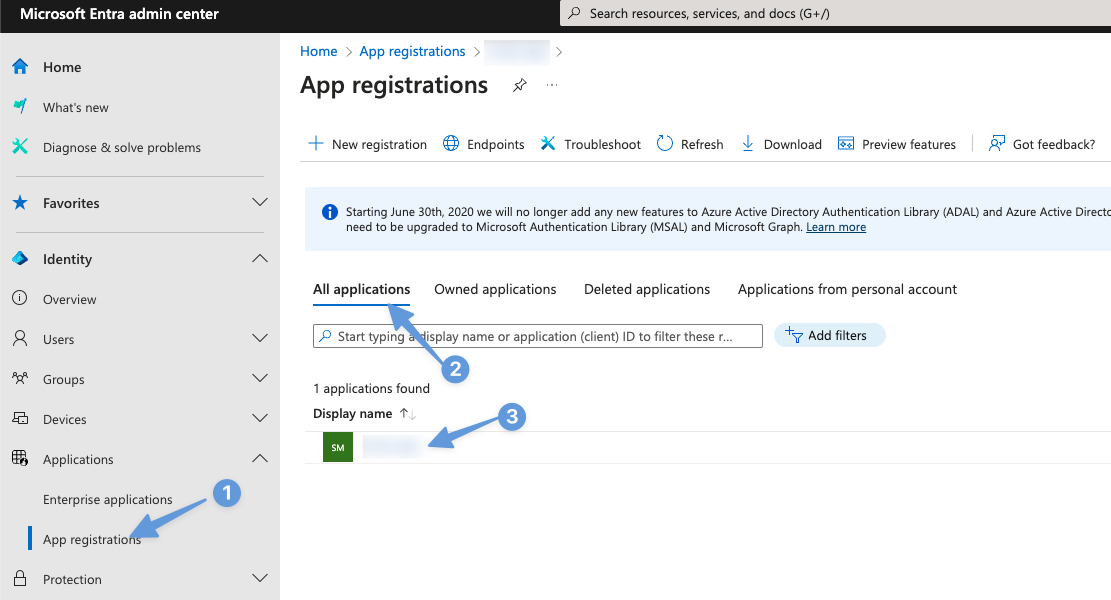
Step 3.2: Create a new application: Browse to Identity > Applications > App registrations, then select "New registration".
Step 3.3: Configure the application: Under "Supported account types", select "Accounts in this organizational directory only".
Step 3.4: Locate your new app: After creation, search for your newly registered application.
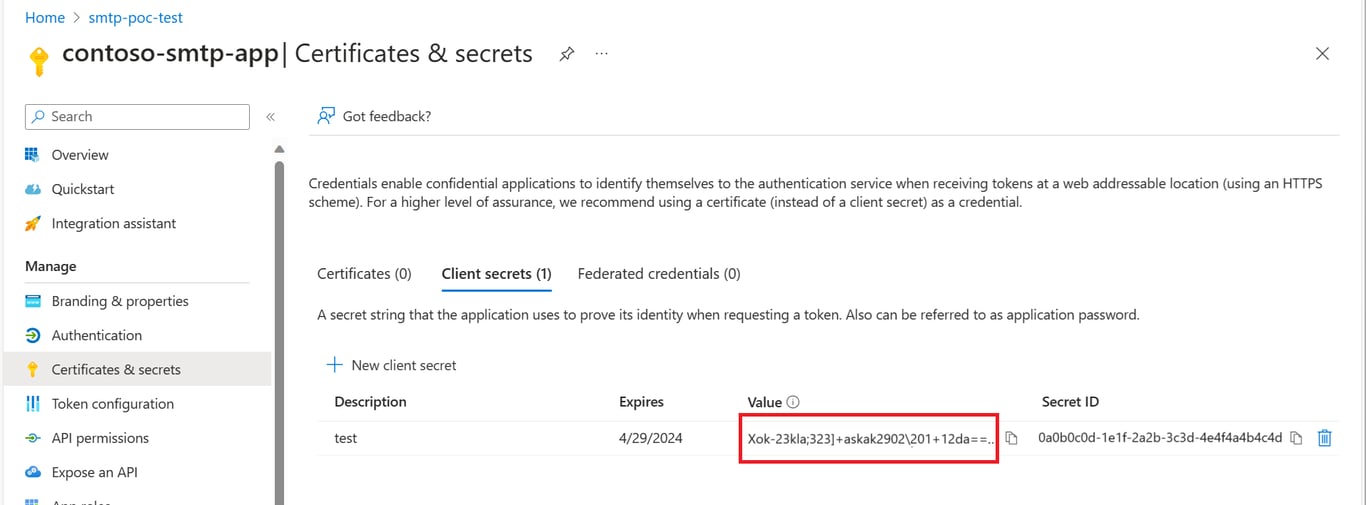
Step 3.5: Generate a client secret: Click on "Certificates & Secrets", then select "New client secret". Fill in the form to create a new secret. Pay attention to the expiry date you set.
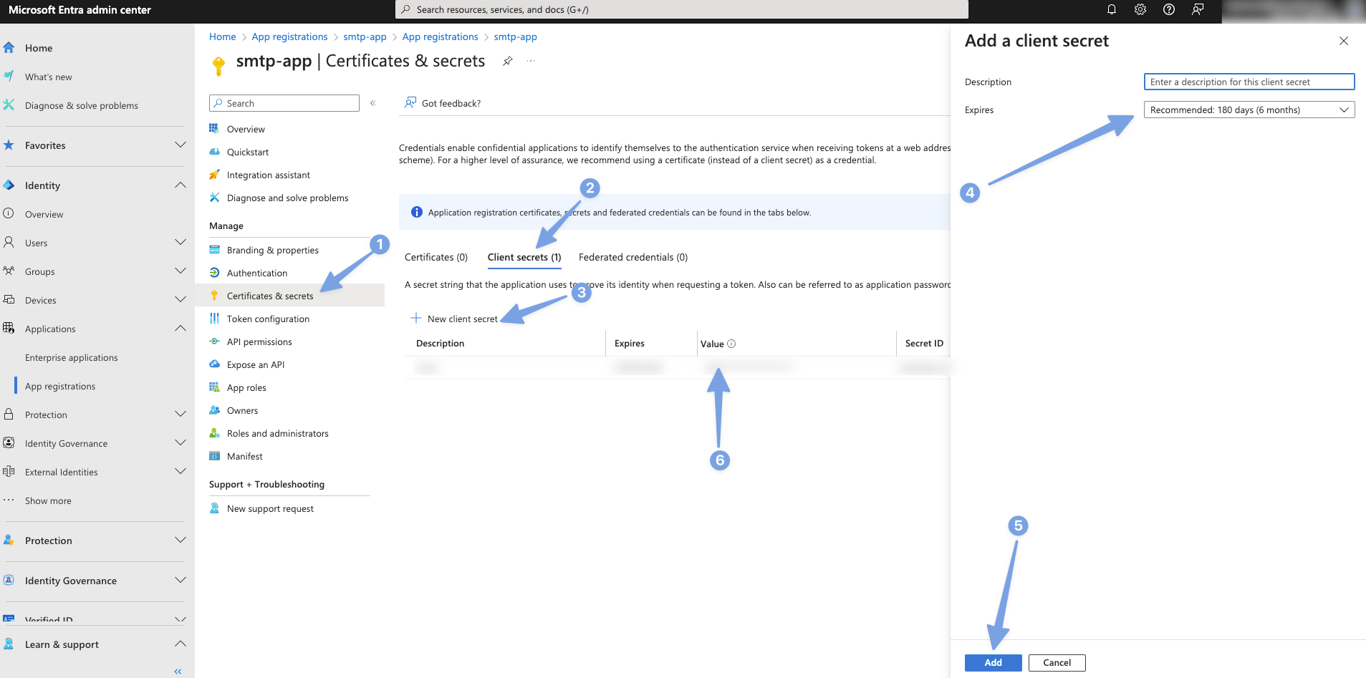
Step 3.6: Store the secret securely: Once the secret is created, immediately copy the "Value" and store it in a secure location. This will be used as part of your SMTP credentials later.
Step 4: Set Up Roles via IAM (Identity and Access Management)
In this step, we'll create a custom role and assign it to our Entra application to grant the necessary permissions for email sending.
Step 4.1 Access Subscriptions: Search for "Subscription" in the Azure portal and select your subscription.
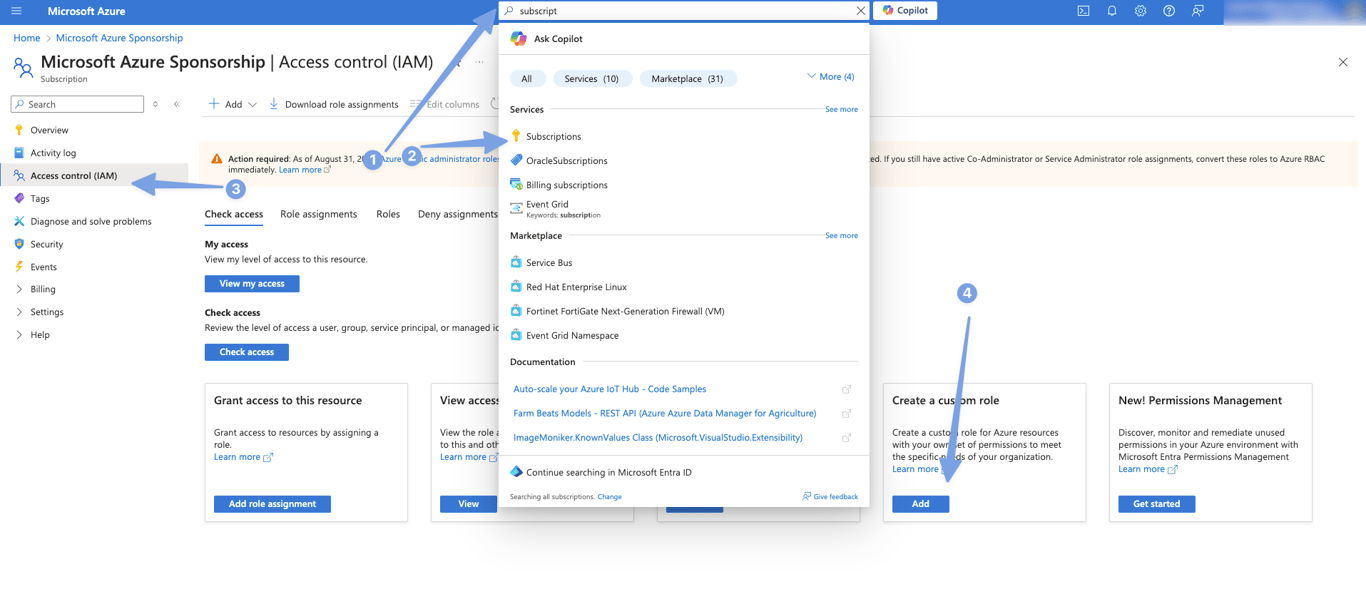
Step 4.2 Navigate to Access control: Click on "Access control (IAM)" in the left sidebar.
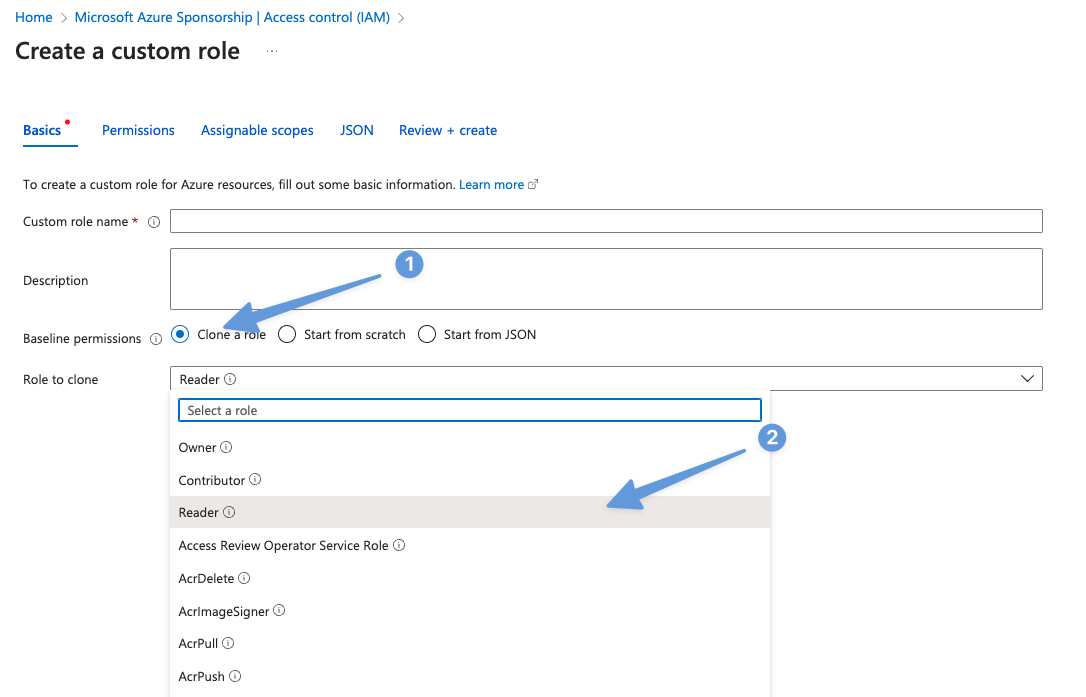
Step 4.3 Create a custom role: Select "Create a custom role".
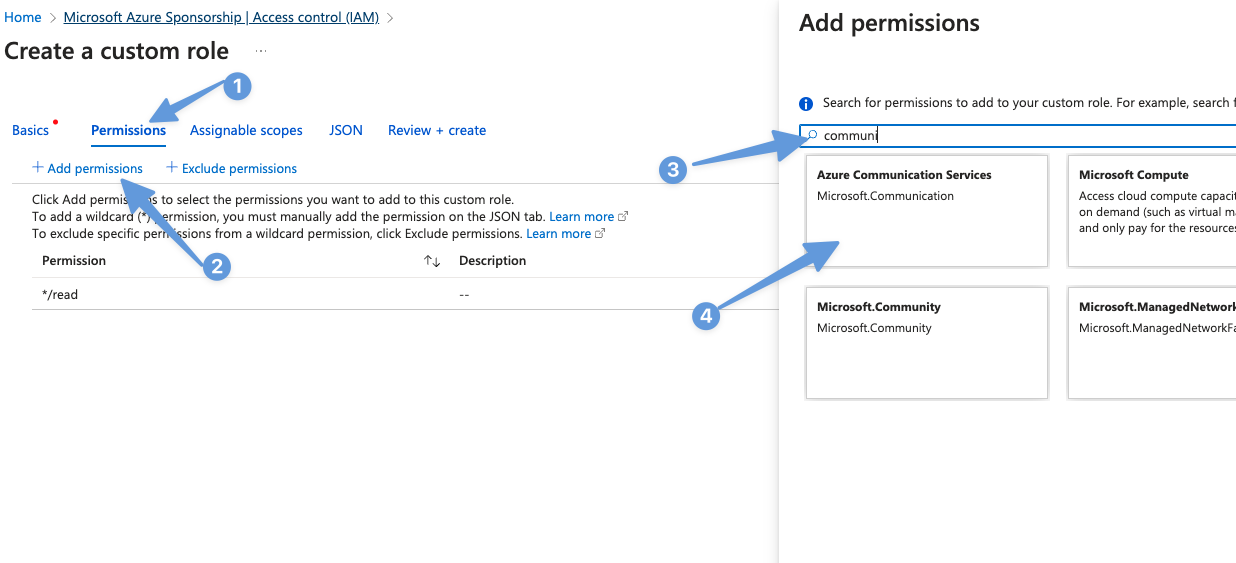
Step 4.4 Clone an existing role: Click on "Clone a role" and select the "Reader" role as a starting point.

Step 4.5 Add permissions: Click on "Permissions", then "Add permissions". Search for "Azure Communication Services".
Step 4.6 Select specific permissions: Choose the following permissions:
Write: EmailService_CreateOrUpdate
Read: Gets/Lists communication services
Write: Create/update communication services
Step 4.7 Finalize role creation: Review the settings and create the role.
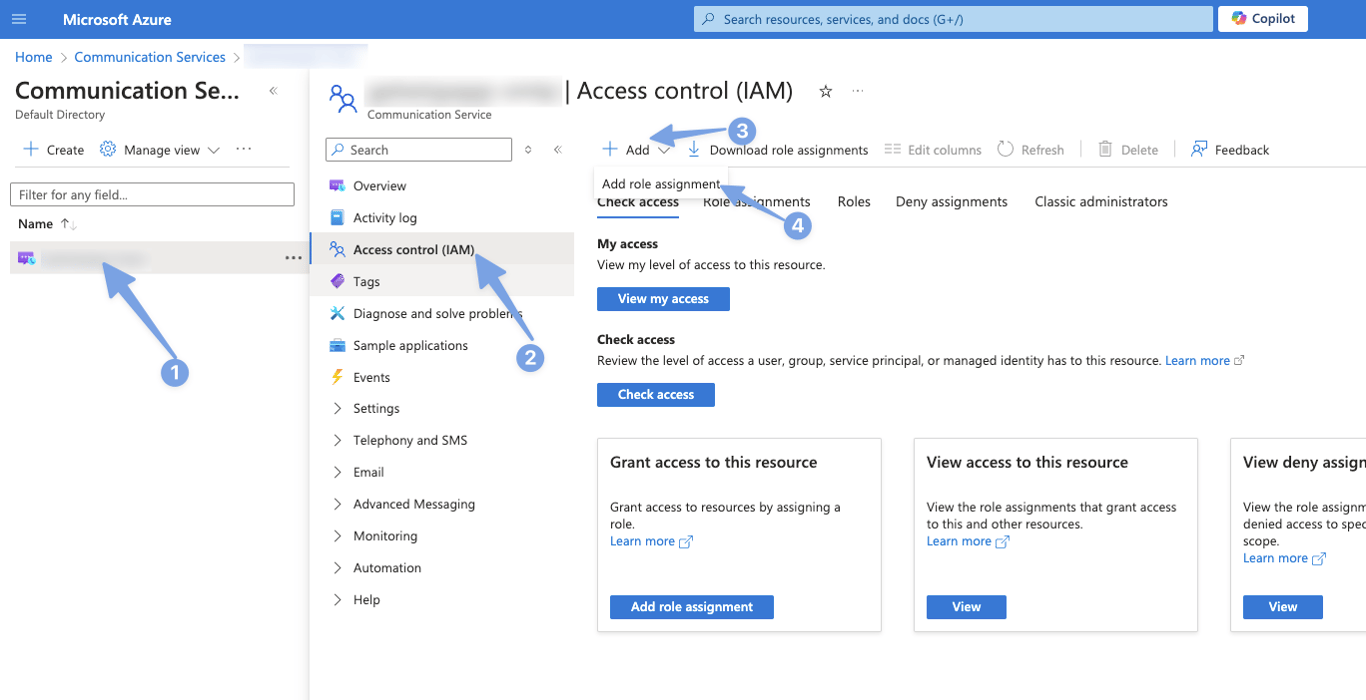
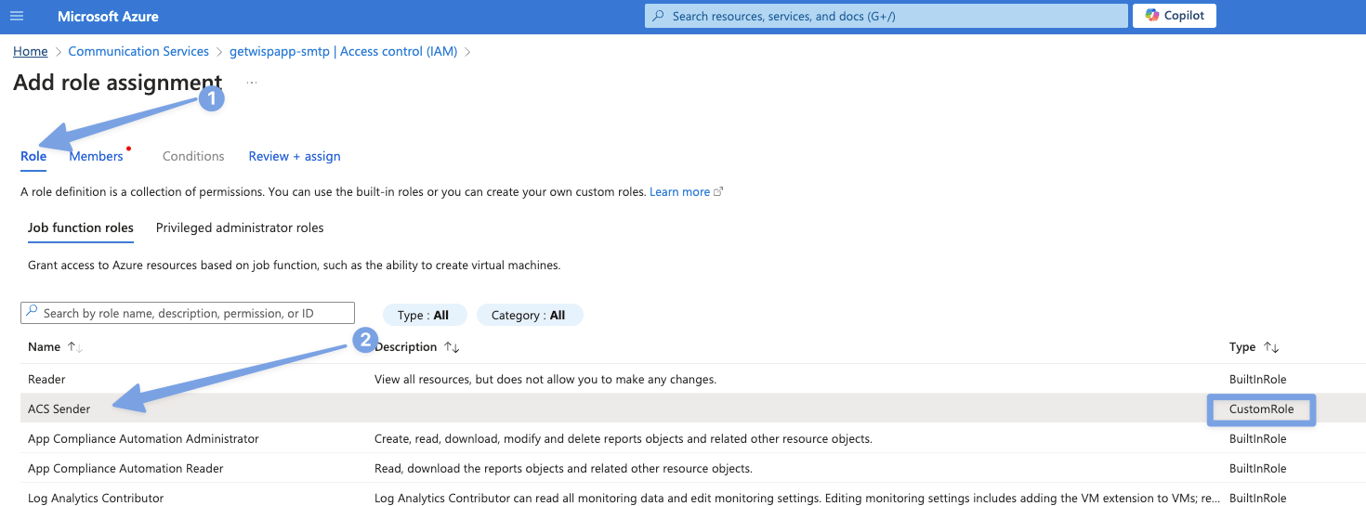
Step 4.8 Assign the role: Navigate to your Communication Service, click on "Access control (IAM)", and select your newly created custom role.
Step 4.9 Add a member: Click on "Members", then "Select members". Search for and select your Entra application name. Review and assign the role.
Congratulations! You've now connected your Entra identity to the Communication Services. This connection allows you to use the Entra credentials for SMTP authentication.
These steps lay the groundwork for secure, programmatic email sending through Azure. In the next section, we'll cover how to obtain and use your SMTP credentials.
Step 5: Getting Your SMTP Credentials
Now that we've set up all the necessary components, we can gather the SMTP credentials that will allow you to send emails programmatically through any SMTP client.
Username
Your SMTP username is a combination of three different identifiers. You'll need to concatenate these in a specific format:
Azure Communication Service Resource name
The Microsoft Entra Application ID
The Microsoft Entra Tenant ID
The format for your username will be:
<Azure Communication Services Resource name>.<Microsoft Entra Application ID>.<Microsoft Entra Tenant ID>Here's how to find each component:
Azure Communication Service Resource name: This is the name you gave your Communication Service when you created it.

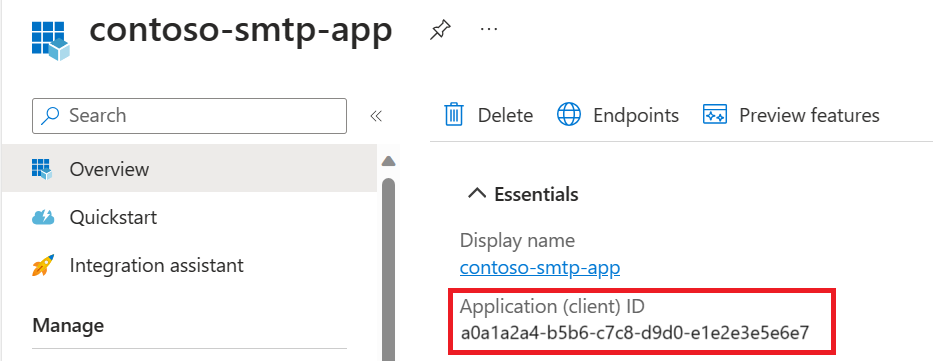
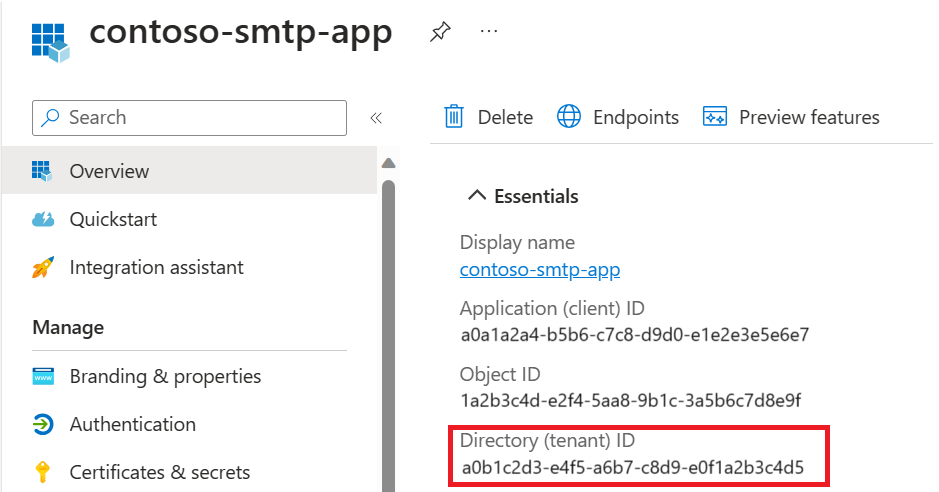
Microsoft Entra Application ID: Go to your Entra application and find this in the Overview section.
Microsoft Entra Tenant ID: This can also be found in your Entra application's Overview section.
Example: If your services have the following values:
Azure Communication Service Resource name: acsemail-smtp-example
Microsoft Entra Application ID: a0ala2a4-b5b6-c7c8-d9d0-ele2e3e5e6e7
Microsoft Entra Tenant ID: a0b1c2d3-e4f5-a6b7-c8d9-e0f1a2b3c4d5
Your username would be:
acsemail-smtp-example.a0ala2a4-b5b6-c7c8-d9d0-ele2e3e5e6e7.a0b1c2d3-e4f5-a6b7-c8d9-e0f1a2b3c4d5Password
Your password will be the client secret value you generated earlier in Step 3 when setting up Microsoft Entra. If you followed the instructions, you should have saved this in a secure location.
Other SMTP Variables
Here are the remaining details you'll need for your SMTP configuration:
Host: smtp.azurecomm.net
Port: 587
TLS: enabled
Email address: donotreply@<your-custom-domain>
Note: Initially, only the donotreply@ email address is available. We'll discuss how to add more email addresses later in this guide.
Congratulations! You now have all the necessary SMTP credentials to start sending emails through Azure Communication Services. You can test these credentials with your preferred email client or within your application.
Frequently Asked Questions (FAQ)
What is the cost of sending emails through Azure Communication Services?
Azure Communication Services charges:
$0.00025 per email sent
$0.00012 per MB transferred
These costs allow for precise budgeting based on your email volume and size. For the most up-to-date pricing information, visit: https://azure.microsoft.com/en-gb/pricing/details/communication-services/
What are the email sending volume limits?
The limits vary depending on whether you're using a custom domain or an Azure managed domain:
With a custom domain (per subscription):
30 emails per minute
100 emails per hour
With an Azure managed domain (per subscription):
5 emails per minute
10 emails per hour
These limits are in place to maintain service quality and prevent abuse. For more details on limits and quotas, see: https://learn.microsoft.com/en-us/azure/communication-services/concepts/service-limits
How can I request a quota increase for email sending?
To request a quota increase, follow these steps:
Understand and improve your domain reputation
Use a custom domain instead of an Azure Managed Domain
Configure a mail exchange record for your custom domain
Build your sender reputation by consistently sending high-quality emails
Submit a request for an email quota increase
To create a support ticket for a quota increase, visit: https://azure.microsoft.com/en-gb/support/create-ticket/
For more detailed information on the quota increase process, see: https://learn.microsoft.com/en-us/azure/communication-services/concepts/email/email-quota-increase
Why is the "Add" button disabled in Azure Email Communication Services MailFrom address?
Initially, you can only use the donotreply@yourdomain.com address. To add more addresses:
Send an unspecified number of emails from the donotreply@yourdomain.com address
Build a positive sending reputation
Request an increase in quota through a support request
This process helps ensure responsible email practices and maintains the service's integrity. For more information and community discussions on this topic, visit: https://stackoverflow.com/questions/78214575/why-is-the-add-button-disabled-in-azure-email-communication-services-mailfrom-ad
Remember, these policies and limits are subject to change. Always refer to the official Azure documentation for the most current information.
Conclusion
We've walked through the essential steps to configure Azure Communication Services for email, from setting up your domain to obtaining SMTP credentials. This setup allows you to send emails programmatically through Azure's robust infrastructure.
Key takeaways:
Proper domain configuration is crucial for email deliverability.
Understanding and adhering to sending limits is important to maintain good standing.
Azure provides flexibility in integrating with various SMTP clients and applications.
There are options for scaling your email operations as your needs grow.
By following this guide and referring to the FAQ, you should be well-equipped to start leveraging Azure Communication Services for your email needs. Remember to monitor your sending reputation and stay compliant with Azure's policies to ensure long-term success with your email operations.
For any additional questions or support, don't hesitate to consult Azure's official documentation or reach out to their support team.